Monday, January 22, 2018

Trimming the Vines
There is not a lot going on in the vineyard right now and to be honest it is not very pretty. The vines are all dormant and most of the work in the vineyard at this time of year is focused around maintenance and trimming trees to make it easier to get the tractor around in spring. 

One thing that does need to be done is we need to trim the vines back (prune). We do this every year to control the growth of the vines for optimal fruit production. We will trim the shoots back to the point where every shoot will produce two buds. 
 As you can see the vines are dormant and the canes are rather long. 
 Here is a section that has been pruned. 
Don't worry in a few months new buds will form and there will be lots of new growth and plenty of grape bunches. 

 One added benefit of the pruning is that it makes it a lot easier for the tractor to get down the rows. Now that we are starting to get some grass growing we will need to disk the rows to help control the weeds. 

7mm-08 Project #8

Ebony Tip
I wanted to install an ebony tip on this rifle. The ebony tip is mostly aesthetic but it does protect the end grain of the stock. So it has some function. But in reality I wanted for aesthetic purposes.  
 First the stock was measured and marked for the location of the tip. 
 Then the stock was mounted into the miter saw. A small wedge was made and taped in place to insure that the miter saw cut would be perpendicular to the line of the barrel. 
 Holes were drilled to accept the reinforcing dowels that would be glued in to hold the ebony tip in place. You can see that I got a little indecisive and marked it several times before I figured out where I wanted the holes. 
 Dowel transfer punches were inserted into the dowel holes and the position was transferred to the ebony block. 
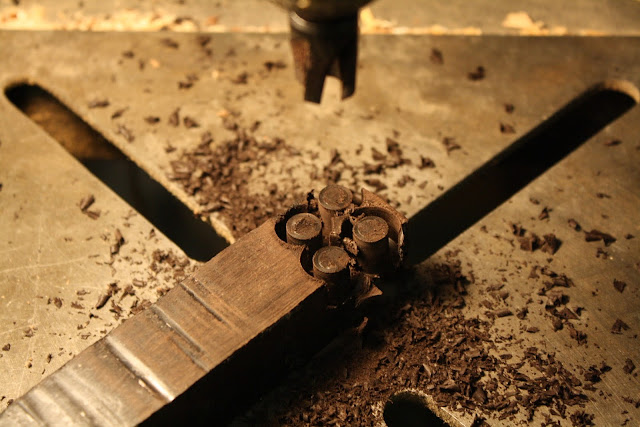
 The ebony block was drilled to accept the dowels. Here you can see blue masking tape on the drill, that is used to identify where to stop the drill when drilling the holes. 
 The block was cleaned with acetone prior to bonding it in place. I have read that Ebony is very oily and you need to remove all the oil with acetone before bonding. 
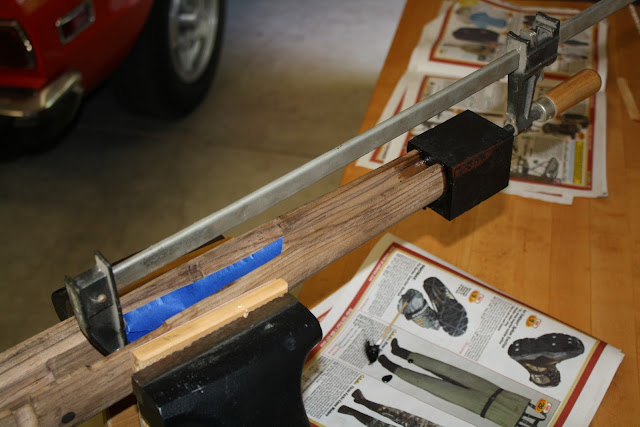
Here the tip is bonded and clamped in place to cure.

Sunday, January 21, 2018

7mm-08 Project #7

Filling a Flaw
My stock had a slight flaw in it that needed to be repaired. This was a void in the wood and needed to be filled.  
 First I used a pick to remove any of the soft wood in the flaw to prepare it for filling.
 Because this flaw was located where the checkering would be I decided to fill it with epoxy. Epoxy is very hard when cured and would checker well. Here I am applying the epoxy with a toothpick working it into the void the best that I could. 
 The completed patch curing. 
 After sanding it down I noticed a few small voids in the epoxy where there were some tiny air bubbles. 
 To fill the voids I used some polyurethane, this was applied by toothpick. 
Once everything is cured and sanded the void is now filled. 

Saturday, January 20, 2018

7mm-08 Project #6

Inletting the Action
Once the bottom metal is inletted it is time to turn my attention to inletting the barreled action. 
 The first thing that I do is insert the action inletting screws into the bottom metal and let it seat into the stock. I then like to scribe a line just inside the edge of the metal work to have as a reference. This is a "don't go past line". Here you can see me scribing the line with a chisel. You will also notice that the action and barrel sits very high in the stock. A lot of material needs to be removed from the stock to make the two fit together.
 I use soot from a home made lamp to show me where I need to remove wood. The metal work is covered with soot and then inserted into the stock. The soot will adhere itself to the high spots in the wood (also to my hands, face, pants, you get the picture) and that wood will be removed with a scraper or chisel. With each pass the metalwork will settle  a little deeper into the wood.
 Here you can see some soot being applied. The lamp is very simple it is an old baby food jar that I made a little ferel to hold a wick and some kerosene in it.
 Here the action is partially inletted, at this point the action has probably been installed and removed 20-30 times during the process. The action is still high and has a way to come down to its final spot.
 Here you can see my inletting tools, the chisels are used for rough work in the beginning the I switch to the scrapers. When the scrapers are used a very small amount of wood is removed and then the action is inserted and checked. This is a very time consuming process but it yields a very close action to wood fit.

I keep my tools in tool rolls that I made. It is quite and investment to buy all these tools and if you don't keep them sharp they are worthless. So for me it is worth taking good care of them. The tool rolls have a leather section to protect the cutting edge of the tools.
 
Here the process is complete, this has taken several days and countless hours to get to this point but you can see that the metal and wood have a very close fit almost like they were one piece. This is not a process you want to try if you are in a hurry. But I find it to be one of the most enjoyable processes in gun building. There is something very relaxing about lighting the torch, smoking the metal and then scraping small amounts of wood away.

Friday, January 19, 2018

7mm-08 Project #5

Inletting the Bottom Metal
When inletting the action into the stock I like to start with the bottom metal first. Then I use the screw holes in the bottom metal to center the action while inletting. This insures that the action returns to the same place each time you remove it. The inletting process takes a long time and the action is inserted and removed many times during the process. So it is important that you return it to the same place each time. 

For this project I chose to use a semi-inletted stock. A semi-inletted stock is a stock that has 70-80% of the shaping and inletting completed and you just need to do the final inletting and shaping. I like them because I find that it is easier to get the correct proportions when most of the rough work is already done. 

But there is still a lot of work left to complete the stock work! 
For this stock I chose to inlet the bottom metal in the mill. I trued up the bottom mounting surface of the recess and opened up the sides to fit the bottom metal. 
 Then I inserted the bottom metal and taped it in place in preparation of inletting the action. 
Here you can see the action with inletting screws attached. The inletting screws are rods that fit very tightly into the screw holes on the bottom metal. They are threaded on one end so they can be screwed into the action. These rods will keep the action aligned with the screw holes as the inletting is performed. 

Thursday, January 18, 2018

7mm-08 Project 4#

Cross Bolt
One issue with the Remington 700 action is that the cylindrical shape of the action can act as a wedge and sometimes split the stock in the web area behind the floor plate. This happens when the action is drawn down tight into the bedding or during recoil. This can effect the integrity of the bedding and ultimately effect the accuracy of the rifle.  I chose to reinforce this stock with cross-bolts to mitigate this issue. 
 First I identified where I wanted the reinforcement and drilled two holes through the stock for the bolts. 
 Then I mounted the stock in the mill so that I could machine a counter bore for the plugs that would cover the cross-bolt holes. 
 Here you can see both holes counter bored 
 Then I inserted a machine screw and nut and drew them down tight. 
 A simple machine screw is more than enough to reinforce this area. 
 I decided to use Ebony to plug the holes because I was planning on putting an ebony tip on this stock and I thought that the ebony plugs would look nice. Here I am using a plug cutter to make the ebony plugs.
Then I put epoxy in the holes to lock the cross-bolt screws in place and inserted the ebony plugs. 
Here you can see the ebony plugs after then were filed down.

Wednesday, January 17, 2018

7mm-08 Project #3

Bottom Metal Clean Up
The bottom metal on the Remington 700 is aluminum and although it is completely functional I wanted to dress up this Rifle a little. So I bought a Mauser style bottom metal and saddle floor plate for this project. 
 I thought that the profile of the bow was a little chunky so I decided to trim it down a little. 
 First, I coated the bow in layout fluid (so I could see my scribe lines) and then scribed reference lines on the top and sides of the bow. 
 Then I filed to each line making a subtle radius on the bow. 
Here you can see the bow after filing and rough polishing. It is a subtle change but it softens up the lines of the bow a little. 
 I then turned my attention to the saddle floor plate. A few passes with sand paper reviled the the floor plate was not flat and had some machining marks left in it. These can be seen by the vertical lines in this picture. 
A little draw filing and some polishing with fine sandpaper and the surface is flat. Cleaning up these surfaces are subtle changes but if not done they will be really noticeable after the final polish and bluing. So it is worth taking the extra time to do them.