Friday, June 29, 2018

Cannon

It all started with a Wee' Dram

One evening my father and I were sitting on his back porch drinking a Wee' Dram of Scotch and smoking Cigars when he brought up a Signal Cannon the he saw in an antique store in England. He really wanted the Cannon but could not figure out how to get it home, So he did not buy it. 

As the night wore on, we decided that he needed a Cannon and that we would find one. Well the next day I went over to my dads house to find him surfing the internet looking for Cannons. So I went home and helped with the search. 

It did not take long for us to form a plan, we would buy a casting and build the rest. We decided that it should be a Naval Cannon and that we would build the base out of walnut. After all if you are going to have a Cannon you want it to be top notch. 

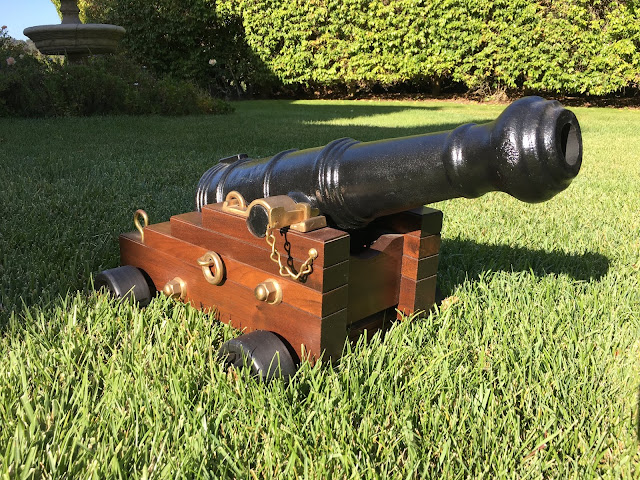
Ironically we decided on a 1/3 Scale Carronade, A Carronade is a small Cannon that was designed and built by the Carron Company in Falkirk Scotland. It was Smaller and Lighter than traditional Ships Cannons of the time and enabled the Ships to carry more of them, increasing their firepower. 

It seemed like the perfect Cannon to have.


After many hours of filing castings, polishing bronze pieces, and woodwork the Cannon was complete. Here is the Cannon complete sitting in front of my Fathers Bar where it traditionally resides.


We were very proud of our handy work but one thing was missing. We had never fired the Cannon. Last night we decided that we needed to take it out and shoot it. I loaded up some blank charges. After all we are not currently under siege from Pirates so there was no need for a cannon ball. 


1.5 Oz of Black Powder makes a pretty good boom and fireball out of this little gem. 


 Here is a video of the Cannon firing


When I was a young Man my Father told me that every man should own a Brooks Brothers Tuxedo, and I think that he was correct. But I would add that every man should own a Cannon! 

Wednesday, June 27, 2018

Land Rover Defender

Defender 

I am a big fan of the Land Rover Defender. I have to say that I may have cried a little when I heard that they will no longer make them. I have driven them a few times in Scotland and they are too small for me, my feet get stuck in the door jamb when I try to step out, and the ride is not that great. All of the Gamekeepers that I know prefer a Toyota Hilux Pickup and they are probably right. But I absolutely love the Land Rover.

My Wife wants a Range Rover, not me, give me a 2 Door Diesel Defender and I would be a happy man. Someday I will buy one.

The sight of a Land Rover in the Highlands just makes me smile. I don't know what it is about them but like a good set of Tweeds or a Flatcap they just feel right.

Anyway, I stumbled across these pictures tonight and decided that I would add them to the Blog. A Green Defender, a Stag, and a Very Happy Yank...


Monday, June 25, 2018

Boot Treatment

Boot Treatment

What is a Hunting Blog without a post on boot treatment. I used to be very laxed on boot treatment and then I had a pair of my favorite boots crack and split long before the sole was worn down. At that point I decided to take better care of my boots. 

On top of that as I get older my feet become more sensitive and I have a hard time finding boots that I like. So once I do have boots that I like I want to take care of them. 

I tend to treat my boots twice a year. Once during summer in preparation for deer season and once during the winter. In between I clean them occasionally and treat if needed. 

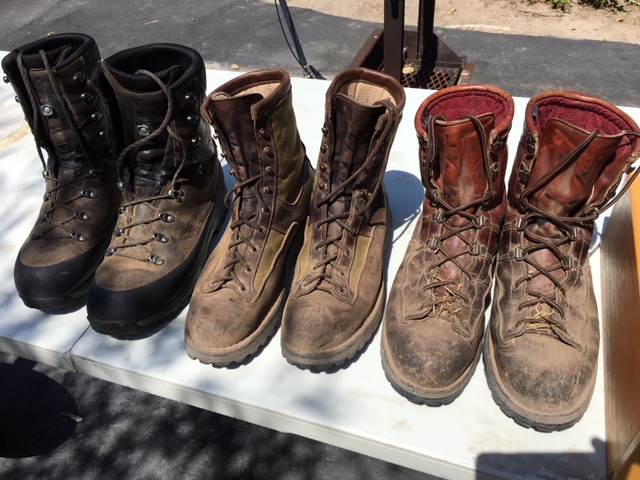
I will be treating three pairs of boots, a pair of Lowa Boots, and two pairs of Danner Boots. I use different treatments for the boots depending on the mfg and the use for the boots. 

Here are my dirty boots getting ready to be cleaned. 


 First step is to remove the laces. For the boots that I use locally they tend to get a buildup of Foxtails in them. I make sure to brush out any Foxtails and dirt in this area of the tongue. 


 After the laces are removed I give them a good brushing with a stiff boot brush to remove the surface dust. 


 Then I give them a good scrubbing with saddle soap and water. In this case I am using Lexol leather cleaner. I spray it on and then scrub away. After I have scrubbed the boot sufficiently I rinse the boot in clean water and repeat as necessary until the boot is clean. 

It is important to get off all of the dirt, if you apply treatment on top of the dirt you are just forcing the dirt into the leather. 


 Once they are clean I leave them out in the sun to dry. I like to leave them 24 hours to make sure that the boot is fully dry before moving on to the treatment. 


 At this point I turn my attention to the laces. I give them a wash in the sink with hot water and some mild detergent. You would be surprised how dirty they really are. 


 I use different treatments depending on the the maker of the boot and the use. The Lowa Boots on the left are my Scotland boots so I treat them with Obenauf's LP, it is a waxed based treatment that does a really good job of nourishing the boot and protecting them from the wet weather in Scotland. These boots are fairly well treated so I will not treat them at this point. One item of note, Lowa recommends against over treatment as it can soften the adhesive that bonds the rubber rock rand to the boot. 

I have found that the leather in Danner Boots seems to do better with their boot treatment. So I will treat my Danner Hunting Boots with the Danner Boot Treatment. In this case the Brown Boot Treatment. 

The third pair of boots is a pair of Danner Boots that I use almost daily when working in the Vineyard. These boots are often covered in very fine soil from the vineyard and are prone to drying out. The fine soil from the vineyard sucks the moisture out of the boots leaving the leather very dry. I will not use the Danner Boot Treatment because it is a wax/cream base treatment and the film that it leaves on the surface can bond with the fine dirt in the vineyard. So, I will treat these with Obenauf's Leather Oil to nourish the leather. I will allow it to soak in and fully dry before using the boots. This pair of boots is over 18 years old and is still going strong. 


 Here are the two boots with the treatment applied. I will give them 24 hours to let the boot cream and oil to soak in. 


 All three boots cleaned and ready to be put back into service. The Lowa boots will be placed into the boot bag in the back of the picture for storage. I don't use the Lowa Boots regularly so I like to store them in a boot bag to keep them clean and dust free. The dust does not bother me from an appearance standpoint but it does dry out the leather and a boot bag helps protect them a little more. 


Thursday, June 21, 2018

Pig Hunting

Early Start Pig

Every Year during Deer Season I see Pigs. I usually get a pig tag but don't end up shooting one because I don't want to screw up my deer hunt. Personally, I would rather shoot a deer than a Pig.

The Pigs live up the canyon from us and cross through on their way down the canyon to root for food. During the early summer they make this journey just after sunrise. But as the summer goes on they start making this journey in the dark. So the window to shoot them is limited.

This year I decided to try for a pig early. This was prompted by my last two years of passing them up during deer season and then missing window.  


My objective was to shoot a smaller pig. But as they say "best laid plans..." This large boar stopped 100 yards in front of me in a clearing and offered a easy broad side shot. I thought about waiting to see if a smaller one would come along. But couldn't pass up the shot.

I knew that he was bigger than I wanted but did not realize how big he was until after I shot him!


When lifting him out of the ranger I was really second guessing my reinforcement of the ceiling. I had images of the roof coming down on top of me. But fortunately it held just fine and my winch was a real big help in butchering him.


I have plenty of Pork to last quite a while now. I am looking forward to deer season coming up. Hopefully I can add some venison to the freezer.

Monday, June 18, 2018

Vineyard Update June

Spraying

The Vines are growing quite well and progressing along. As you can see from the picture below they are green, lush, and filling in quite nicely. This photo was taken early in the morning and you can see the cold damp fog lingering over the vineyard.


This time of the year I spend a lot of time spraying. Because of the cold damp mornings the vines are susceptible to getting mold and fungus growing on them. I spray a fungicide on the vines to prevent fungus and mold growth. I also spray some fertilizer that gives the vines micro nutrients. 

Here is the tractor with my small sprayer mounted on the back getting ready to spray. 


Here is a view from the drivers seat, this time of year I spend a morning every other weekend doing this. Because of the rapid growth of the vines I need to spray every other week.  Next month the vines will have completed most of their growth and I will switch to a fungicide that lasts a little longer . The I will only have to spray once a month. 


Here is a view looking back at the sprayer, spraying a fine mist of the Fungicide. I spray early in the morning before the wind picks up so the Fungicide gets deposited on the vines instead of getting blown off . 


Spraying is not the most exciting thing in the world to have on a blog but it is a big part of running a vineyard so I figured that I would include it. 

Tuesday, June 5, 2018

Cartridge Cleaning


Brass Cleaning

Few things start more of a debate in the reloading world than cleaning of brass. People have many views on how clean brass needs to be, and it runs the spectrum from leave the brass filthy to clean room style clean. I think that I am in the middle of the road.

I used to be of the mindset that clean brass was not that important. But then I noticed a few things. First as brass gets dirty it becomes more difficult to seat primers. Second on rifle cases the carbon that forms on the neck can mask split necks. I used to shoot a lot of wildcat rounds and a lot of those rounds are susceptible to split necks. Clean brass facilitates the inspection of brass prior to reloading. 

So I started playing around with cleaning techniques. I figured that I would share my technique with you.

First I remove the primers. After all one of the things that I am trying to accomplish is clean the primer pocket. Then I start by ultrasonic cleaning the brass.

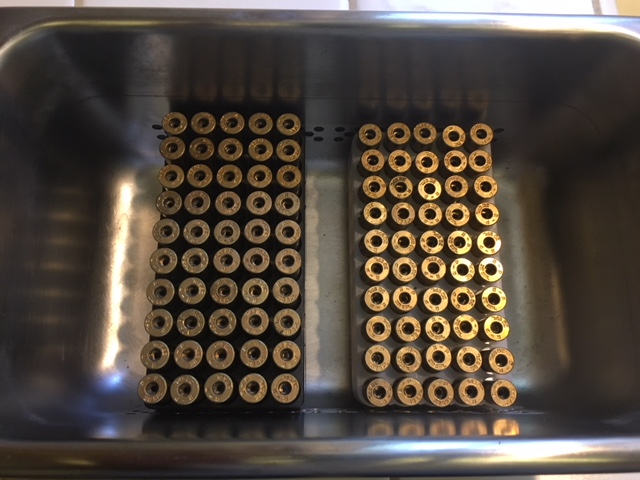
In this case I am cleaning some 38 Special Pistol Brass. For Pistol Brass I use the plastic holders that come in commercial ammunition boxes to hold the brass. For rifle brass I either put the brass into the stainless tray directly or I use a beaker holder that I have made for the ultrasonic cleaner. 


I have tried many concoctions for my cleaning solution but so far the best that I have found is LemiShine, Dawn Dishsoap and Hot Water. I use a very small amount of each, a dime size drop for Dawn, and about the same of the LemiShine. LemiShine is Citric Acid and if you use too much it will Discolor your brass. Some discoloration does happen and we will address that later. 

Both are very inexpensive and go a long way, what can I say I am Cheap! 
  

Here are my trays of brass (100 rounds) Placed into the Stainless Tub of my Ultrasonic Cleaner


Here is the LemiShine/Dawn/Water just after I turned on the Ultrasonic Cleaner. This is once fired brass and not that dirty, but you can see lots of carbon in the primer holes. 


This is about 15 minutes into cleaning operation, The water is now starting to turn black and most of the primer pockets are free of carbon.


Here I have removed the dirty solution and replaced it with clean rinse water and a dash of Baking Soda, I add a small amount of Baking Soda to neutralize that Citric Acid in the LemiShine. After this I do one more rinse in clean water to remove the Baking Soda. 


At this point the brass is clean and free from carbon. 


 Next I dry the cases, I use a food dehydrator to do this. But you could also air dry in the sun or use the oven on warm. 


Sometimes at this point there is some discoloration of the brass. So I put the cases in my tumbler just to give them a final polish. 


After tumbling they look like new. You would not know that these cases have been fired several times. 


Clean both inside an out. 


Is this process for everyone, Probably not. But it works for me. 

I take really good care of my guns and like to feed them with the best ammunition that I can. So to me it is worth the extra step to clean the brass before I start reloading.